As a Shopify agency, we encountered a technical challenge that seemed simple at first: how to schedule the display of content at specific dates (Black Friday, sales, product launches) while taking into account Shopify’s cache system?
This article presents you a complete and technical solution to automate the display of your Shopify blocks and sections based on scheduled dates, while perfectly controlling the cache on the rendering side.
This approach does not require paid Shopify apps, it is completely free.
The Shopify cache challenge
How does Shopify cache work?
Shopify uses an aggressive cache system to optimize the performance of your store. When a visitor accesses a page, Shopify caches the HTML rendering for a variable duration (generally between 5 minutes and several hours).
The problem: If you schedule the display of a Black Friday banner for November 24 at 00:00, but the cache was generated on November 23 at 23:50, your visitors will continue to see the old version until the cache expires.
Cache invalidation dates
Shopify automatically invalidates its cache in several situations:
- product modification
- price change
- Shopify theme update
- modification of certain metafields
Our solution exploits this last point: by updating a shop metafield at specific dates, we force Shopify to regenerate the cache exactly when we want.
Architecture of the solution
Our system relies on three components:
- a Meta Object containing a list of invalidation dates
- a Shopify Flow that runs periodically to update the cache
- a Cloudflare Worker that intelligently calculates the next invalidation date
- Shopify sections/blocks with conditional logic based on dates
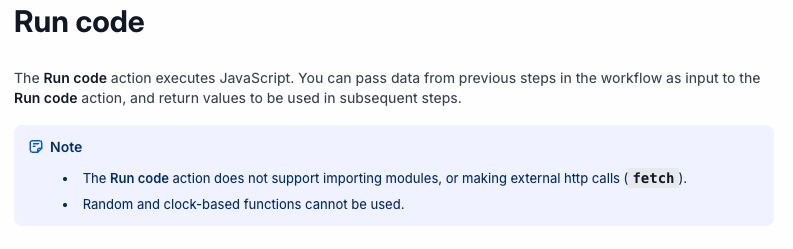
We wanted to use only Shopify flow for calculating the next cache invalidation date but Shopify blocks functions on dates in the Run Code action, as indicated in their doc:
Technical implementation
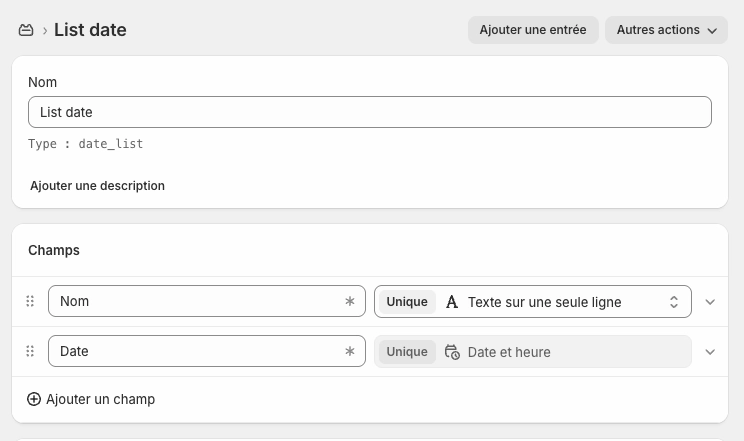
1. Create the Meta Object for dates
Create a Meta Object date_list with a List of date and time type field.
{
  "name": "List date",
  "type": "date_list",
  "fields": [
    {
      "key": "name",
      "name": "Nom",
      "type": "single_line_text_field"
    },
    {
      "key": "date",
      "name": "Date",
      "type": "date_time"
    }
  ]
}
Then add your important dates:
- 2025-11-24T00:00:00Z (Black Friday Start)
- 2025-11-24T23:59:00Z (Black Friday End)
- 2025-12-26T00:00:00Z (Sales Start)
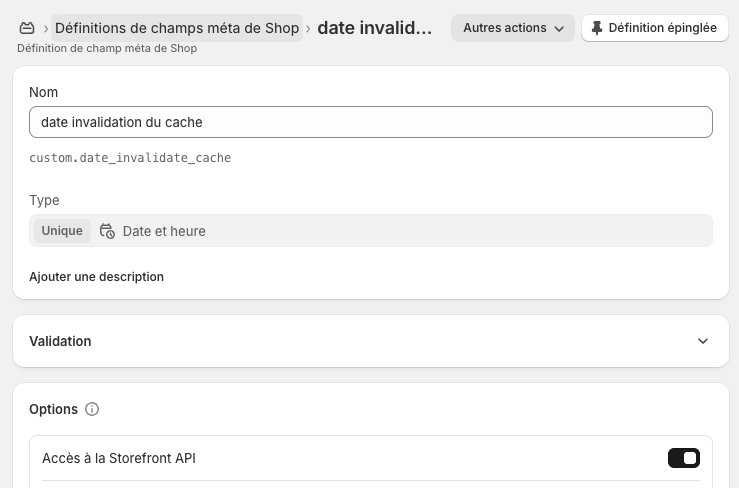
2. Create the cache metafield
Create a metafield at shop level (Shop) to store the current cache date.
{
  "namespace": "custom",
  "key": "date_invalidate_cache",
  "type": "date_time"
}
3. Deploy the Cloudflare Worker
A worker allows you to execute a small piece of code outside of your Shopify store. Very practical to overcome Shopify limitations and without going through a free or paid application.
The worker calculates what is the next invalidation date to use.
export default {
  async fetch(request, env, ctx) {
    if (request.method !== "POST") {
      return new Response("Method Not Allowed", { status: 405 });
    }

    try {
      const body = await request.json();
      const { dates, cache_date, timezoneOffset } = body;

      // Validation
      if (!dates || !Array.isArray(dates) || !('cache_date' in body) || !('timezoneOffset' in body)) {
        return new Response(JSON.stringify({ error: "Missing required fields" }), {
          status: 400,
          headers: { "Content-Type": "application/json" },
        });
      }

      // Helpers
      const parseDate = (dateStr) => new Date(dateStr).getTime();
      const toMinute = (ts) => Math.floor(ts / 60000) * 60000;
      const parseOffset = (offsetStr) => {
        if (!offsetStr) return 0;
        const sign = offsetStr.startsWith("-") ? -1 : 1;
        const hours = parseInt(offsetStr.slice(1, 3), 10);
        const minutes = parseInt(offsetStr.slice(3, 5), 10);
        return sign * (hours * 60 + minutes) * 60 * 1000;
      };

      const now = Date.now();
      const offsetMs = timezoneOffset ? parseOffset(timezoneOffset) : 0;

      // Convertir cache_date (Local Time) en UTC
      let cacheDateTimestamp = cache_date ? parseDate(cache_date) : 0;
      if (cache_date && timezoneOffset) {
        cacheDateTimestamp -= offsetMs;
      }

      // Filtrer les dates valides (entre cache_date et now)
      const validDates = dates.filter((dateStr) => {
        const timestamp = parseDate(dateStr);
        return toMinute(timestamp) >= toMinute(cacheDateTimestamp) && toMinute(timestamp) <= toMinute(now);
      });

      if (validDates.length === 0) {
        return new Response(null, { status: 204 });
      }

      // Trouver la date la plus proche de now
      validDates.sort((a, b) => parseDate(b) - parseDate(a));
      const closestDate = validDates[0];

      // Si identique à cache_date, pas de mise à jour
      if (toMinute(parseDate(closestDate)) === toMinute(cacheDateTimestamp)) {
        return new Response(null, { status: 204 });
      }

      return new Response(JSON.stringify({ cache_date: closestDate }), {
        headers: { "Content-Type": "application/json" },
      });

    } catch (e) {
      return new Response(JSON.stringify({ error: e.message }), {
        status: 500,
        headers: { "Content-Type": "application/json" },
      });
    }
  },
};
Deploy this worker on Cloudflare and note the URL.
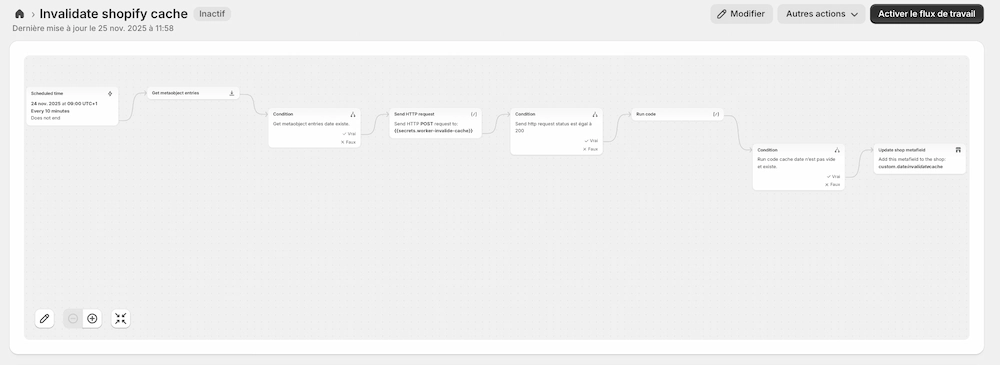
4. Configure the Shopify Flow
Create a Flow that runs every 10 minutes:
Trigger: Scheduled (Every 10 minutes)
Action 1 – Get metaobject data: Retrieve all entries from the date_list definition
Action 2 – Send HTTP request:
Method: POST URL: https://your-worker.workers.dev
Method: POST
URL: https://votre-worker.workers.dev
Body:
{
  "dates": [
    {% for item in getMetaobjects %}
    "{{ item.date.value | date: '%Y-%m-%dT%H:%M:%SZ' }}"{% unless forloop.last %},{% endunless %}
    {% endfor %}
  ],
  "cache_date": "{{ shop.metafields.custom.date_invalidate_cache | date: '%Y-%m-%dT%H:%M:%SZ' }}",
  "timezoneOffset": "{{ shop.timezone | date: '%z' }}"
}
Condition: If Status code equals 200
Action 3 – Run code
export default function main(input) {
  const data = JSON.parse(input.sendHttpRequest.body);

  return {
    cache_date: data.cache_date
  };
}

Output type:
{
  cache_date: String!
}
Action 4 – Update shop metafield:
- Namespace: custom
- Key: date_invalidate_cache
- Value: {{ runCode.cache_date }}
Here is the complete flow:
5. Use dates in your Shopify sections
Now that the cache is managed, create sections with date fields.
Create a section file sections/scheduled-banner.liquid.
{% schema %}
{
  "name": "Bannière planifiée",
  "tag": "section",
  "class": "section-scheduled-banner",
  "settings": [
    {
      "type": "header",
      "content": "Contenu"
    },
    {
      "type": "text",
      "id": "title",
      "label": "Titre",
      "default": "Black Friday : -50% !"
    },
    {
      "type": "richtext",
      "id": "description",
      "label": "Description",
      "default": "<p>Lorem ipsum</p>"
    },
    {
      "type": "image_picker",
      "id": "background_image",
      "label": "Backgrounf image"
    },
    {
      "type": "url",
      "id": "cta_link",
      "label": "Link"
    },
    {
      "type": "text",
      "id": "cta_text",
      "label": "Texte du bouton",
      "default": "Découvrir les offres"
    },
    {
      "type": "header",
      "content": "Planification"
    },
    {
      "type": "paragraph",
      "content": "Sélectionnez une date de début et de fin dans votre liste de dates. La section s'affichera automatiquement entre ces deux dates."
    },
    {
      "type": "metaobject",
      "id": "date_from",
      "label": "Date de début",
      "metaobject_type": "date_list"
    },
    {
      "type": "metaobject",
      "id": "date_to",
      "label": "Date de fin",
      "metaobject_type": "date_list"
    },
    {
      "type": "header",
      "content": "Style"
    },
    {
      "type": "color",
      "id": "background_color",
      "label": "Couleur de fond",
      "default": "#000000"
    },
    {
      "type": "color",
      "id": "text_color",
      "label": "Couleur du texte",
      "default": "#ffffff"
    },
    {
      "type": "range",
      "id": "padding_top",
      "min": 0,
      "max": 100,
      "step": 4,
      "unit": "px",
      "label": "Espacement haut",
      "default": 40
    },
    {
      "type": "range",
      "id": "padding_bottom",
      "min": 0,
      "max": 100,
      "step": 4,
      "unit": "px",
      "label": "Espacement bas",
      "default": 40
    }
  ],
  "presets": [
    {
      "name": "Bannière planifiée"
    }
  ]
}
{% endschema %}
Concrete use cases
Automatic Black Friday banner
Create a banner that automatically displays from November 24 to 27:
Create two entries in your Meta Object « List date »:
- Name: « Black Friday Start », Date: 2025-11-24T00:00:00Z
- Name: « Black Friday End », Date: 2025-11-27T23:59:00Z
In your section, select these dates as date_from and date_to
The cache will be automatically invalidated at midnight on November 24 and at midnight on November 28
Sales countdown
Seasonal visuals rotation
Schedule your visuals for the whole year.
Advantages of this approach
For your Shopify theme
- Optimal performance: Shopify cache remains active, guaranteeing fast loading times
- Temporal precision: your content displays exactly at the planned dates
- Flexibility: modify your dates without touching the theme code
For your marketing team
- Autonomy: Schedule your campaigns weeks in advance
- Reliability: No more risk of forgetting to activate a banner
- Preview: Test your visuals by temporarily modifying the dates
For your performance
- No third-party app: Native solution using Shopify Flow
- Serverless: The Cloudflare Worker is free up to 100,000 requests/day
- Scalable: Works regardless of the size of your store
Conclusion
This technical solution allows combining the best of both worlds: Shopify cache performance and the precision of automated scheduling.
As a Shopify agency, we use this system for all our clients with content scheduling needs. It is particularly effective for:
- Seasonal campaigns (Black Friday, Christmas, Sales)
- Product launches
- Flash promotions
- Recurring events
Need help implementing this solution? Our Shopify agency PrestaRocket